
Create Janitorial Bid
Build a janitorial bid from the customer and building through to a finished proposal you can preview, print or email.
Start the Bid
Open the janitorial module
Click Bids in the top navigation bar and choose Janitorial. The module you are in is shown at the right of the bid bar.
Start a new bid
Click the green New Bid button at the top left.
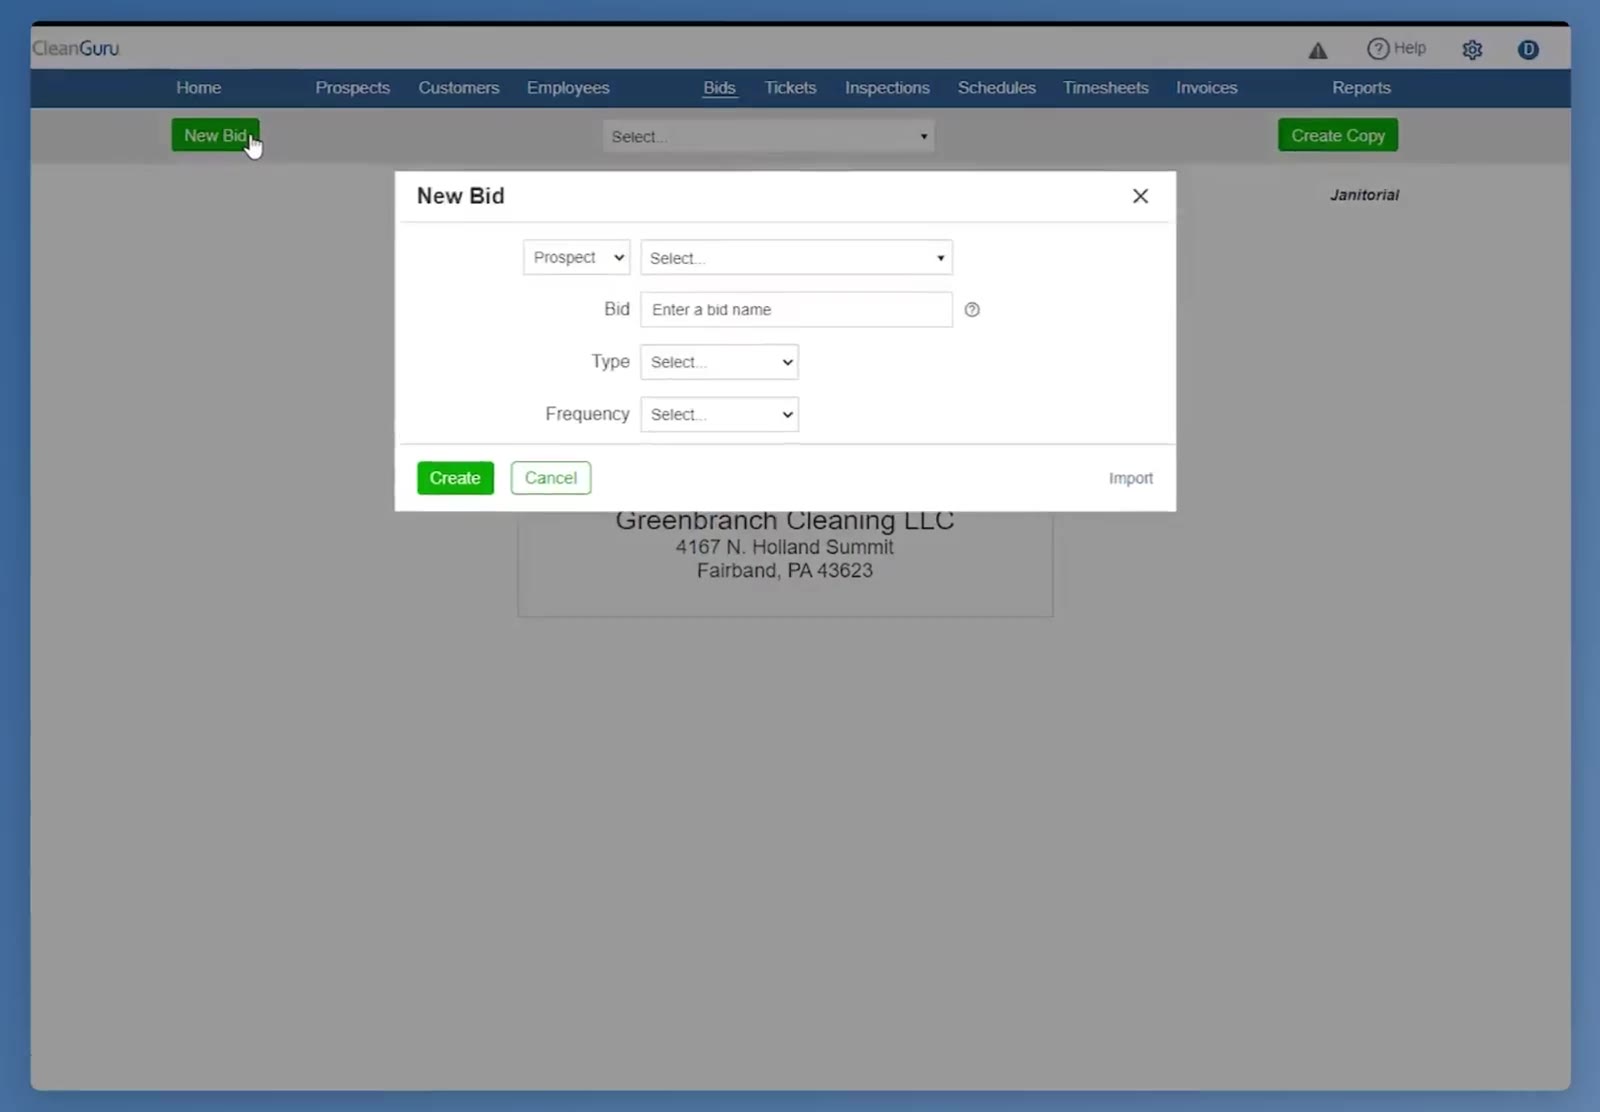
The Bids bar with the green New Bid button, and the New Bid box asking for the customer, bid name, type and frequency.
Choose who the bid is for
Set the first dropdown to Prospect or Customer, then pick the name from the list beside it. Buildings appear as the building name followed by the customer in brackets.
Name the bid and set its basics
Type a Bid name, choose a Type for the building, and choose a Frequency. Click the green Create button.
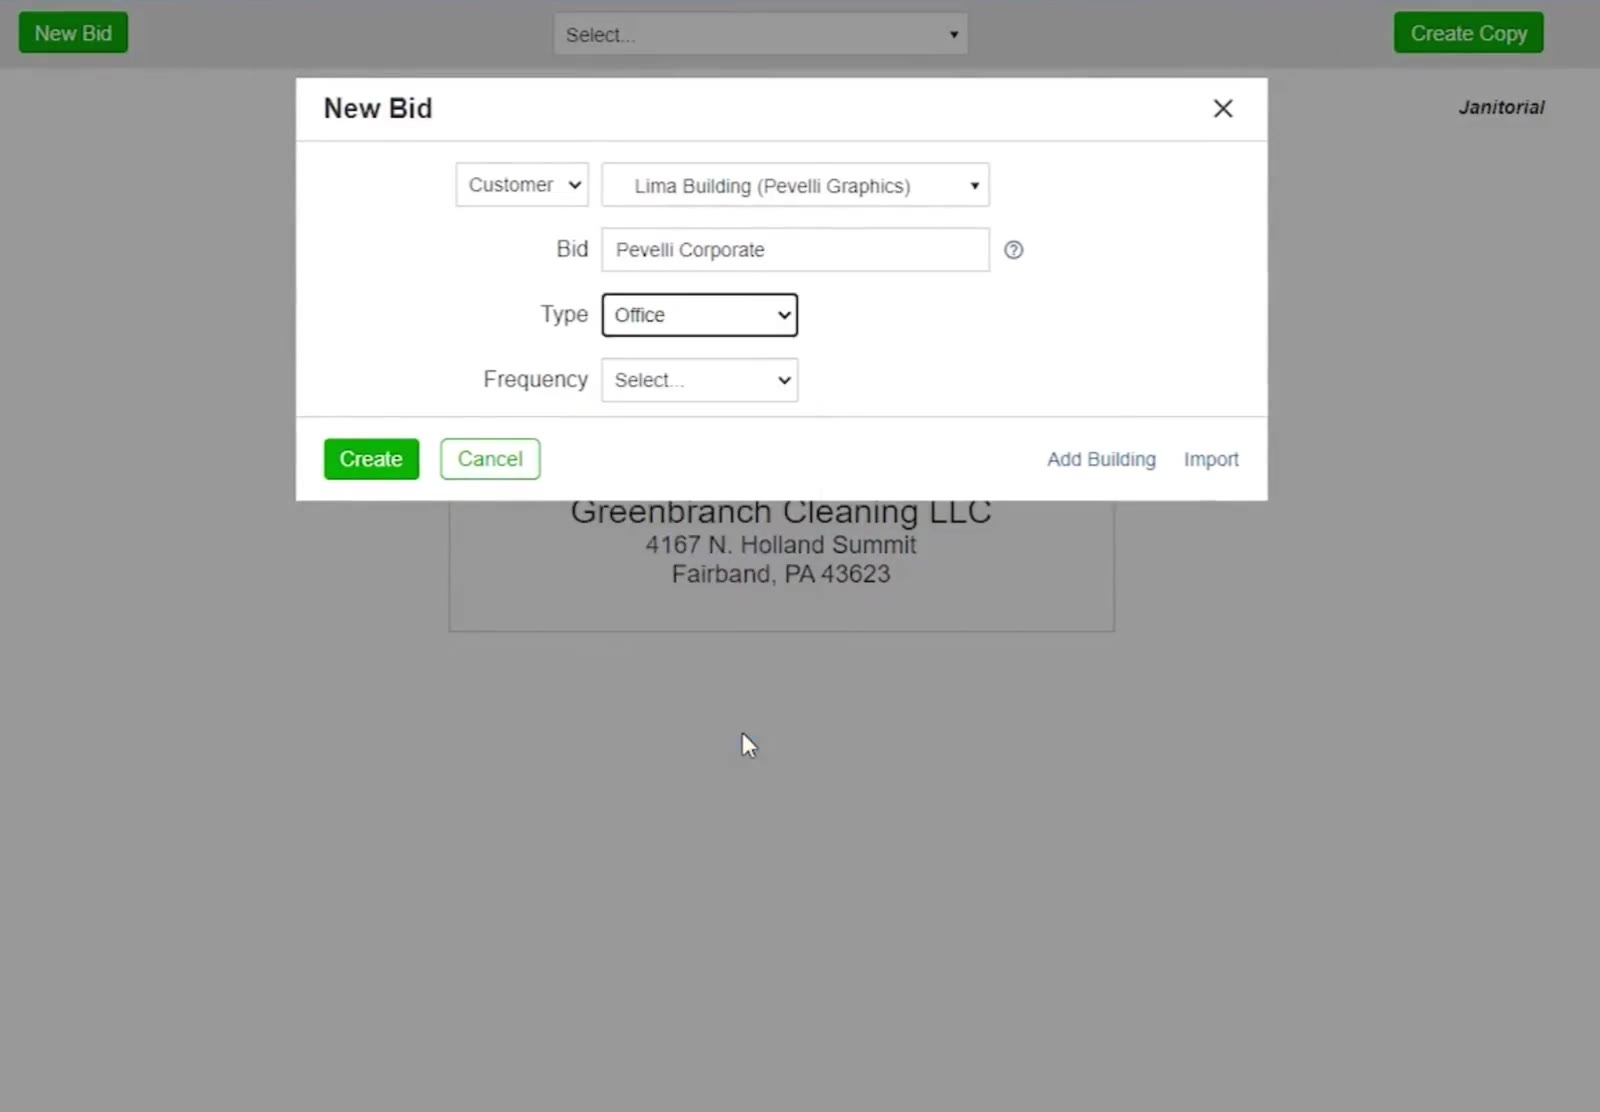
The New Bid box filled in — a customer, a building shown as Lima Building (Pevelli Graphics), a bid name and a building type.
Enter the Measurements
Open the Areas tab
Click Areas. An Enter Measurements box asks whether you want Express or Manual.
Pick a method
Express takes the building’s total cleanable square footage and spreads it across the usual areas for you. Manual lets you measure each area yourself.
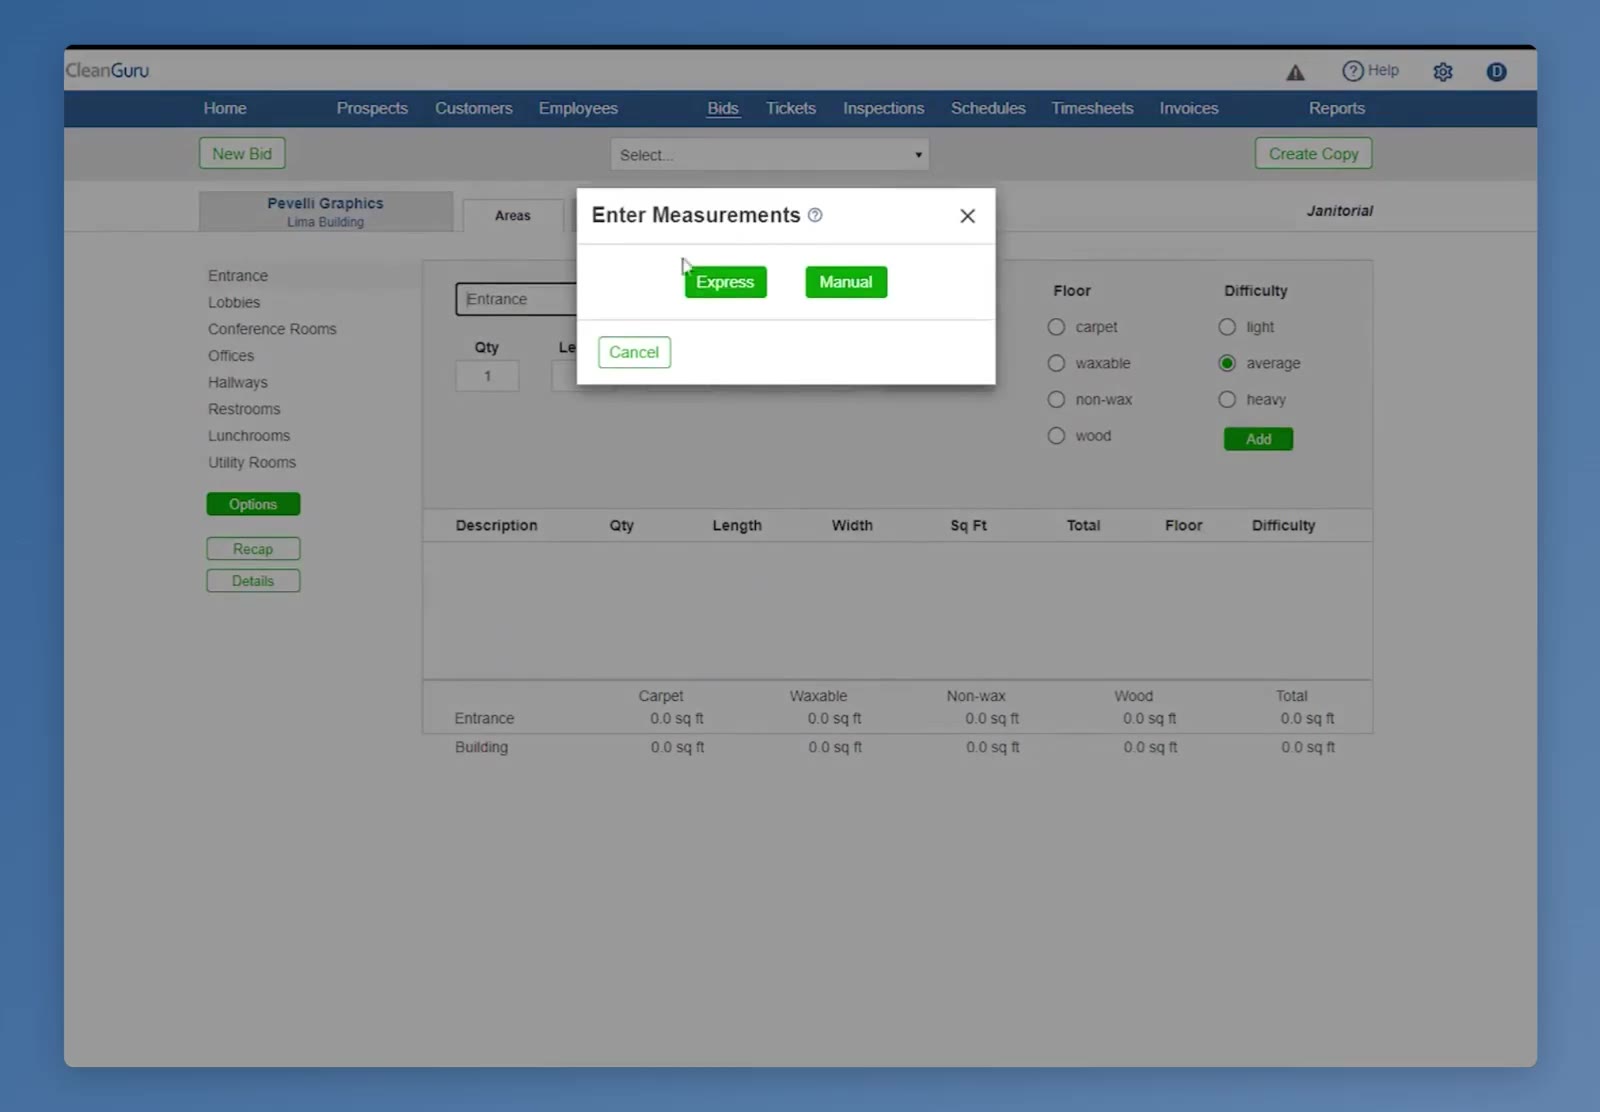
The Enter Measurements box, offering Express or Manual.
Fill in the Express figures
Type the building’s total cleanable square feet in Total. Each area gets a share of that total as a percentage — the running count turns green at 100%. Adjust the Floor mix and the hard-floor Type per area, and use Select area and Add to bring in an area that is not listed. Click the green Enter button.
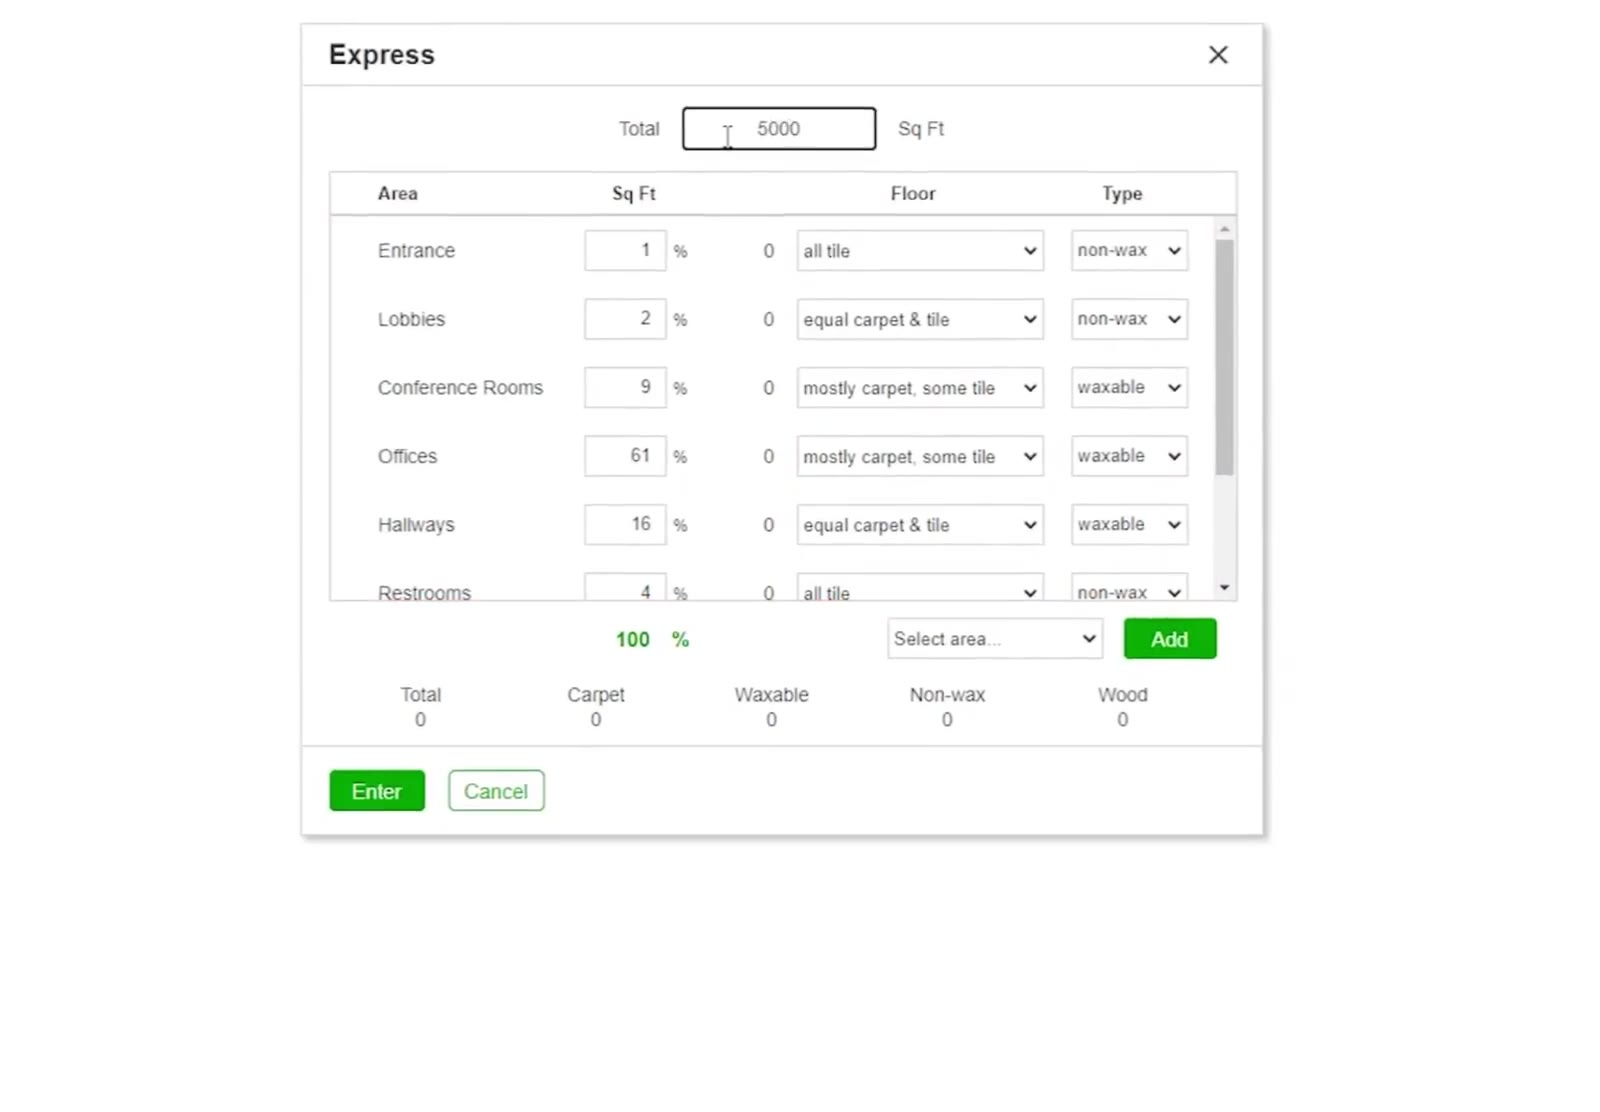
The Express box: a 5,000 sq ft total split across the areas, with the percentages adding to 100.
Open the tasks and items screen
On the Areas tab, click the green Options button below the area list.
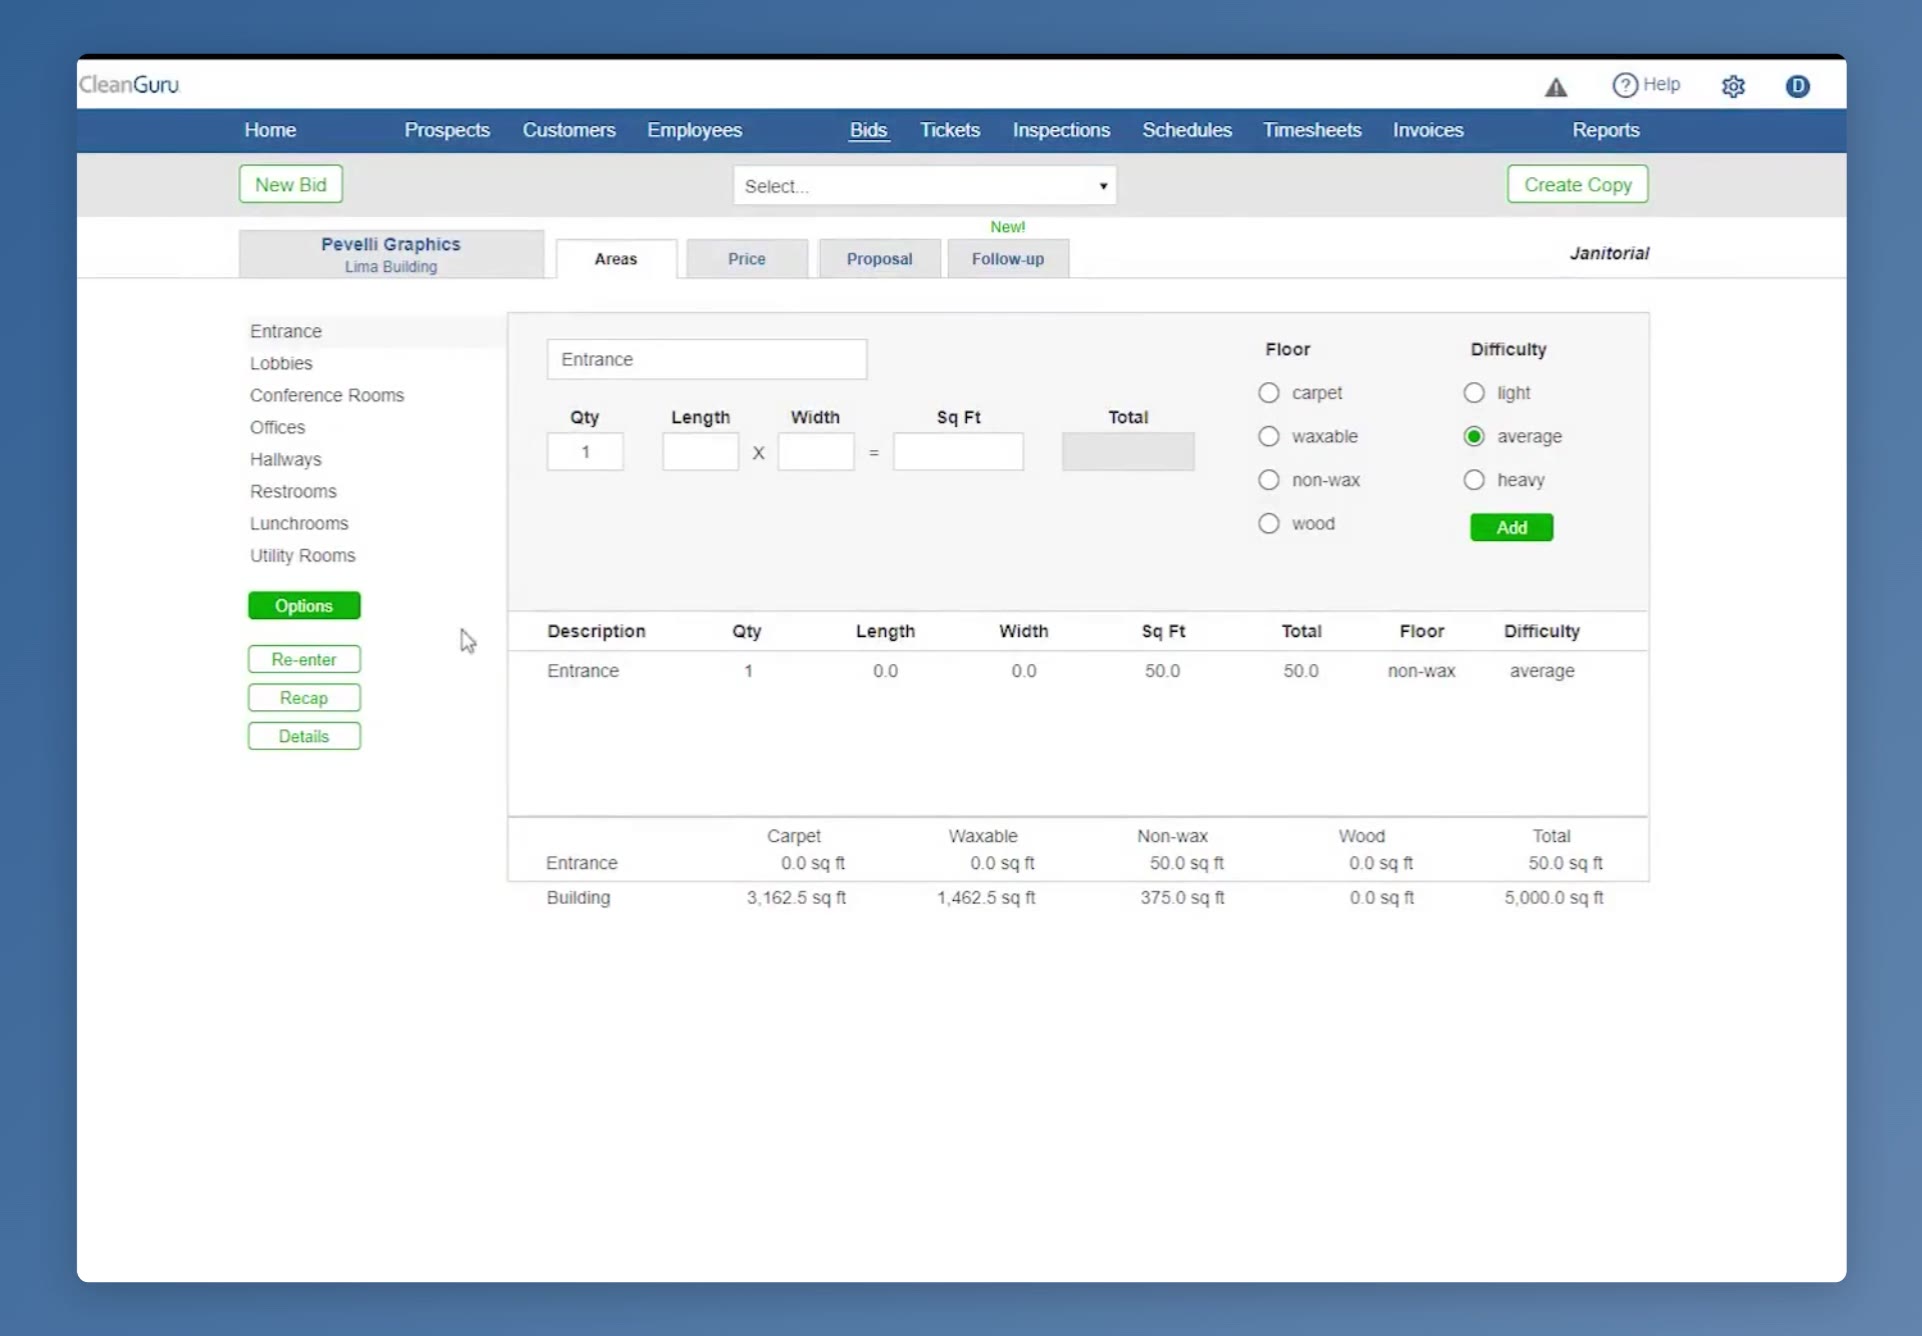
The Areas tab after measuring: the area list on the left, with the green Options button just below it.
Review the cleaning tasks
Pick an area on the left, then add, edit, remove or re-time its tasks and items. Click Go Back when you are finished.
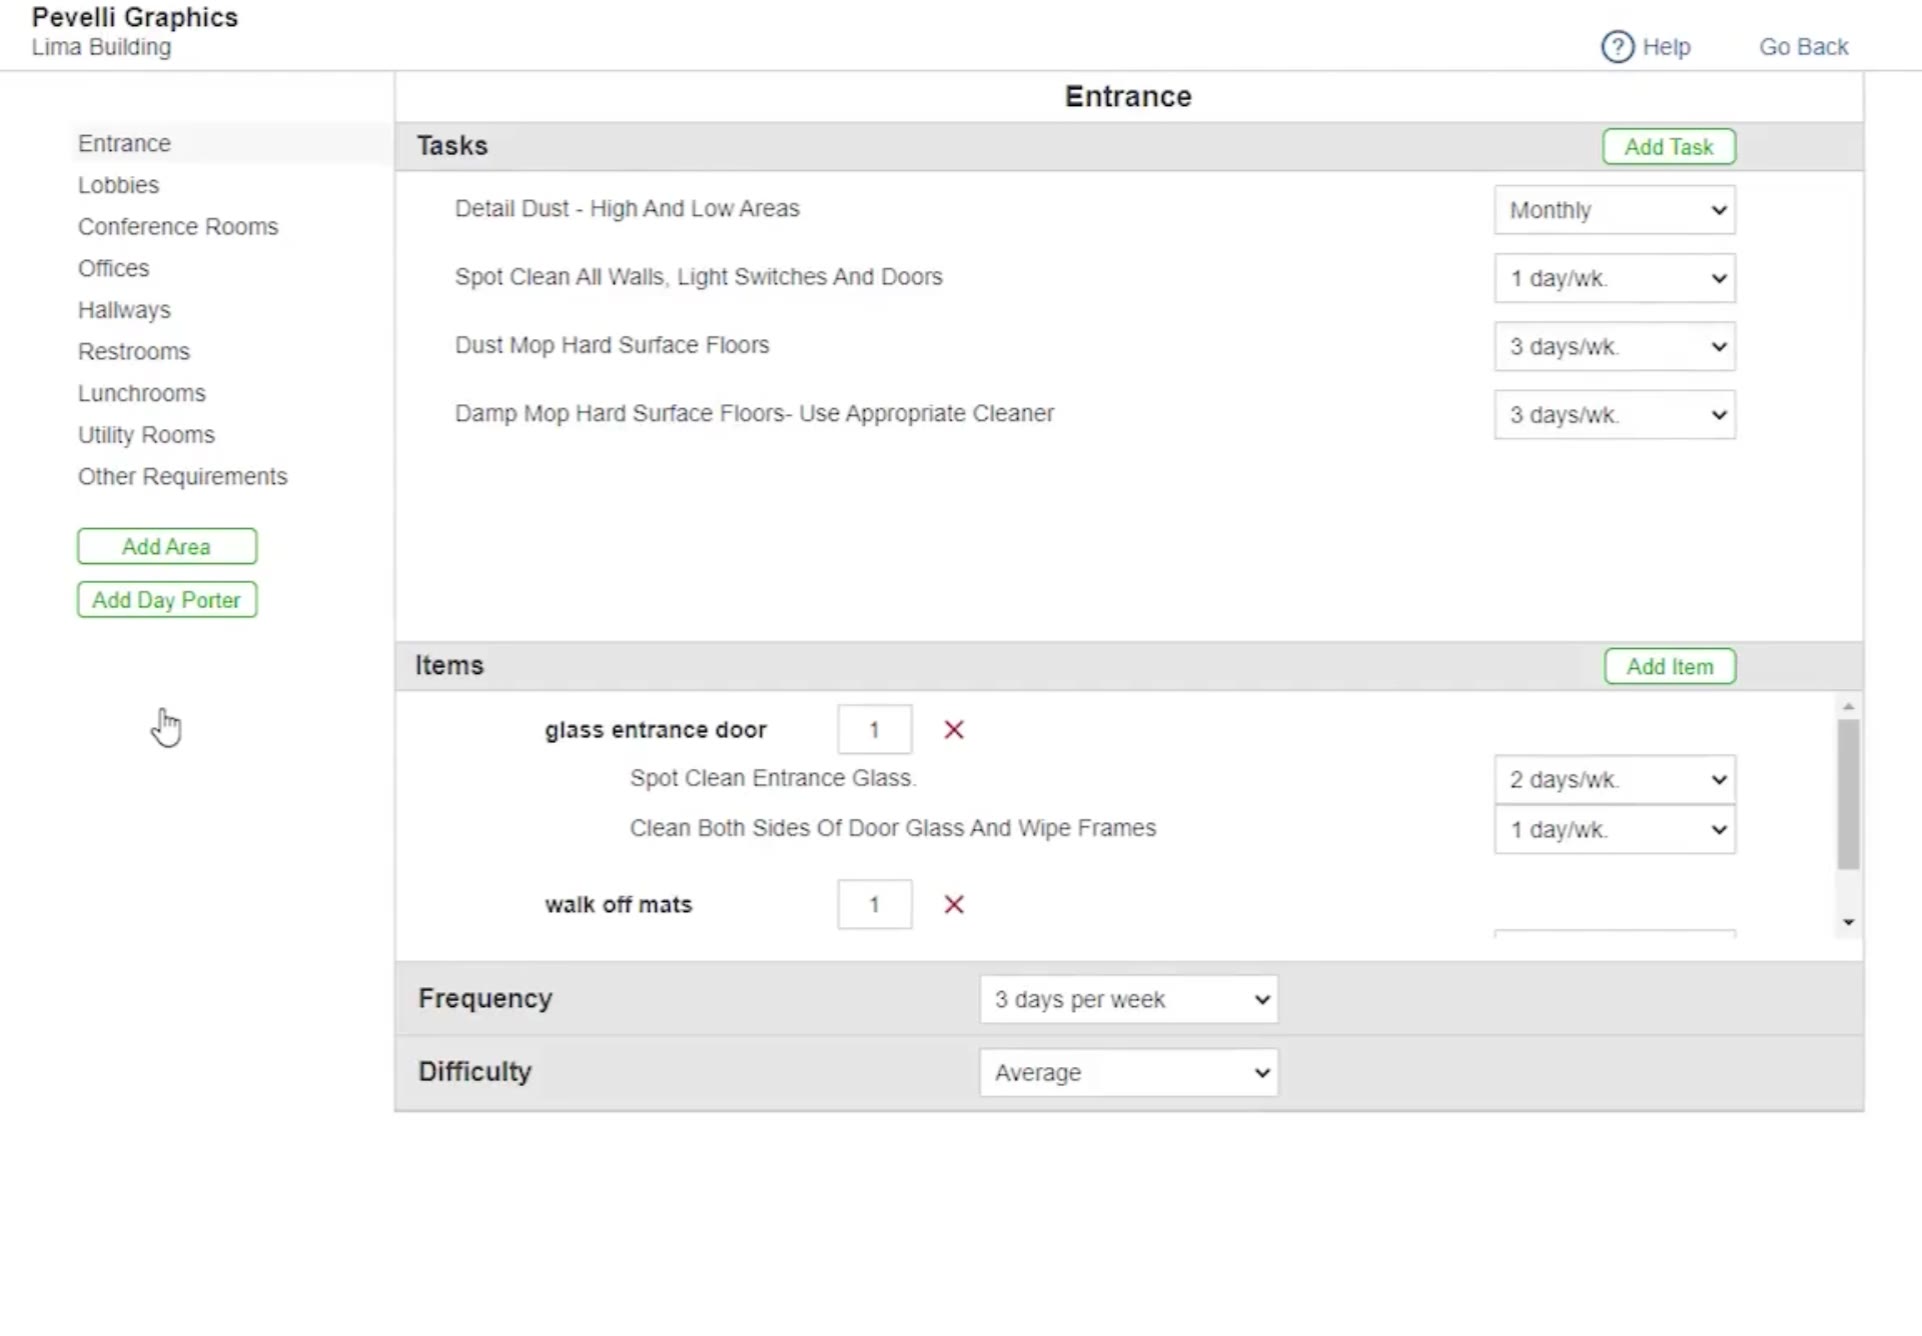
The tasks and items screen for one area, reached with the Options button.
Set the Price
Look at what the job costs
Click Price. CleanGuru calculates the Hours per day and per month, then the monthly cost from Wages, Payroll Taxes, Overhead and Other. Beneath that it shows the calculated Price and the Profit it carries.
Adjust and recalculate
Change any of those figures — the hours or the hourly wage, for instance — then click the green Recalculate button to update the cost and the calculated price.
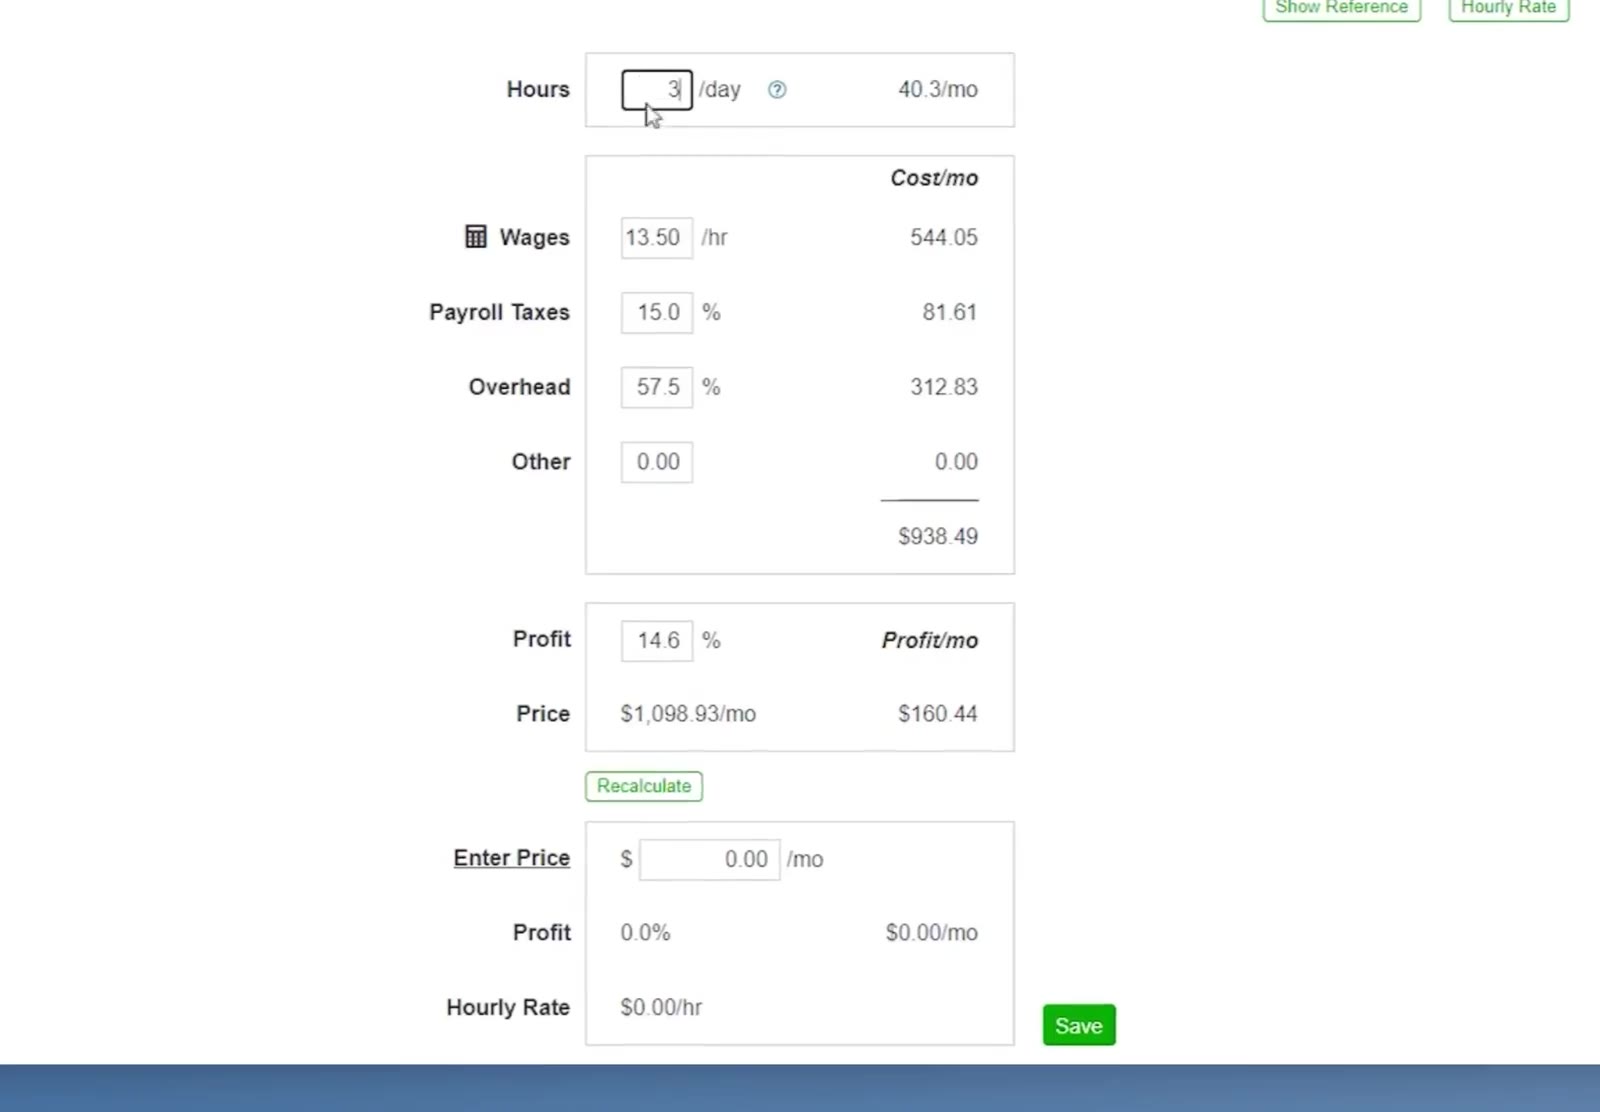
The Price tab — hours, wages, taxes and overhead on the left, the resulting cost and suggested price on the right.
Set your own price
Type the monthly amount you intend to quote in Enter Price, then click the green Save button. CleanGuru fills in the Profit and Hourly Rate that price produces.
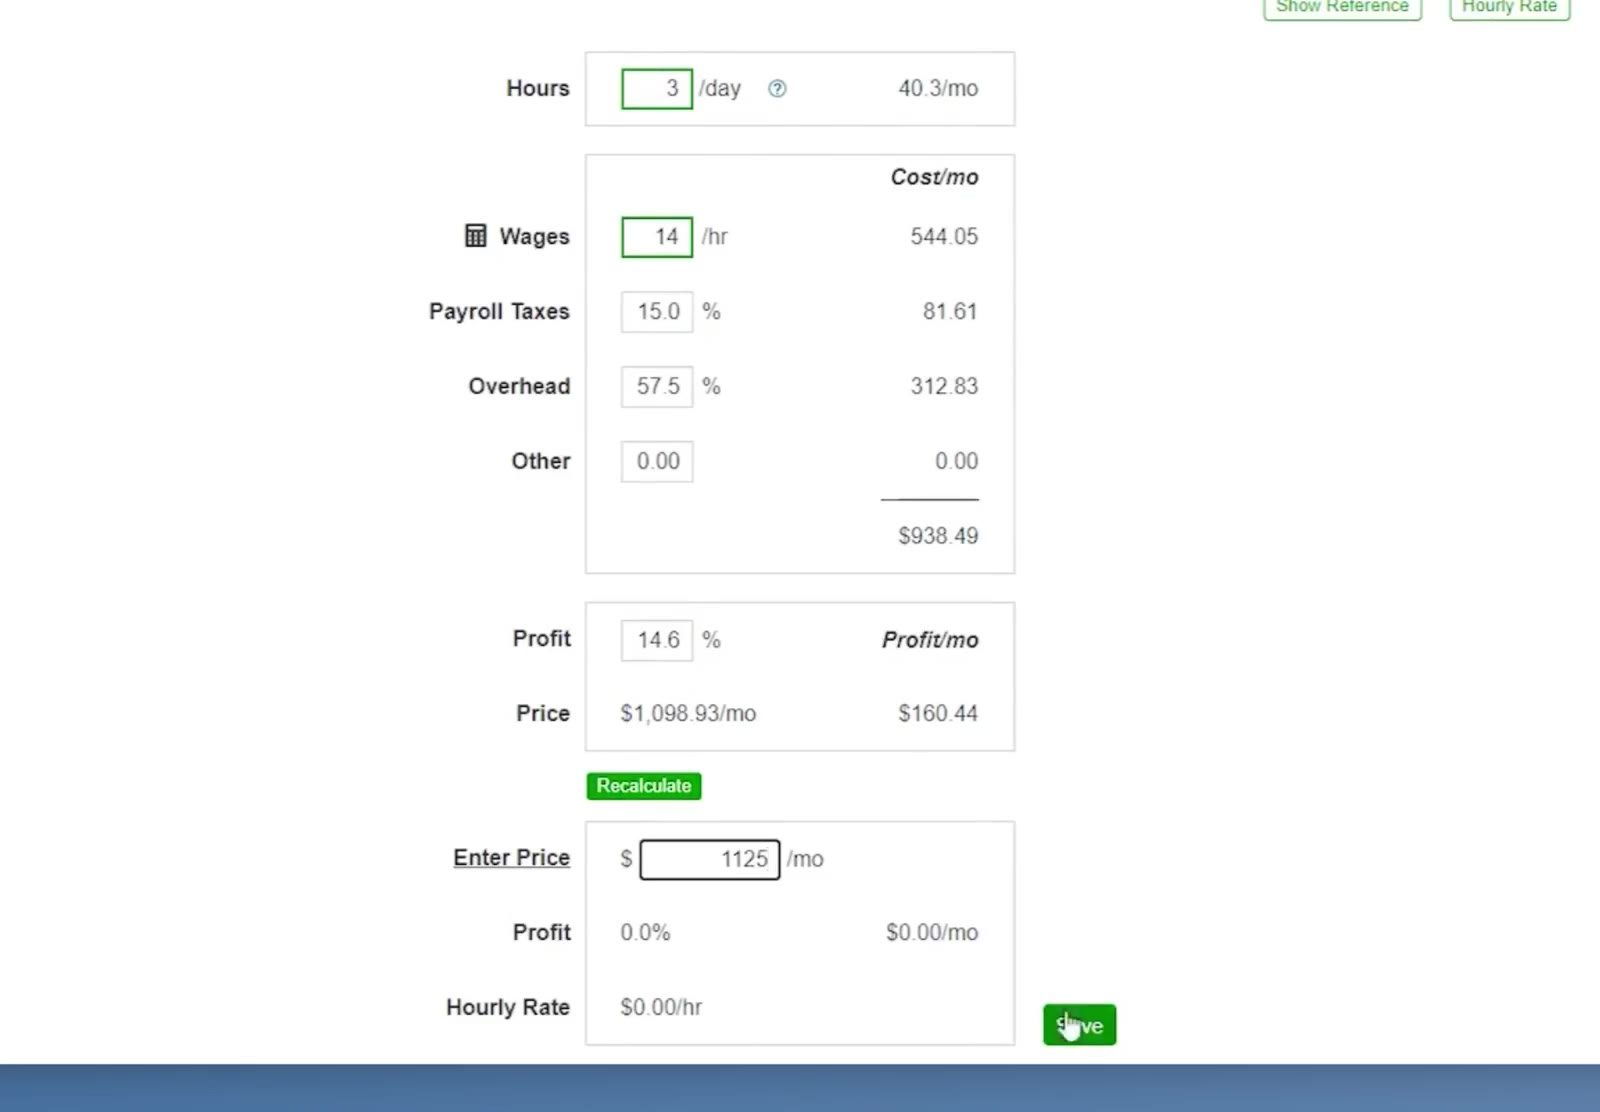
A price typed into Enter Price, with Save alongside it.
Build the Proposal
Choose what the proposal contains
Click Proposal, then tick the documents you want — Proposal, Job Specifications, Measurement Summary and Area Hours Summary.
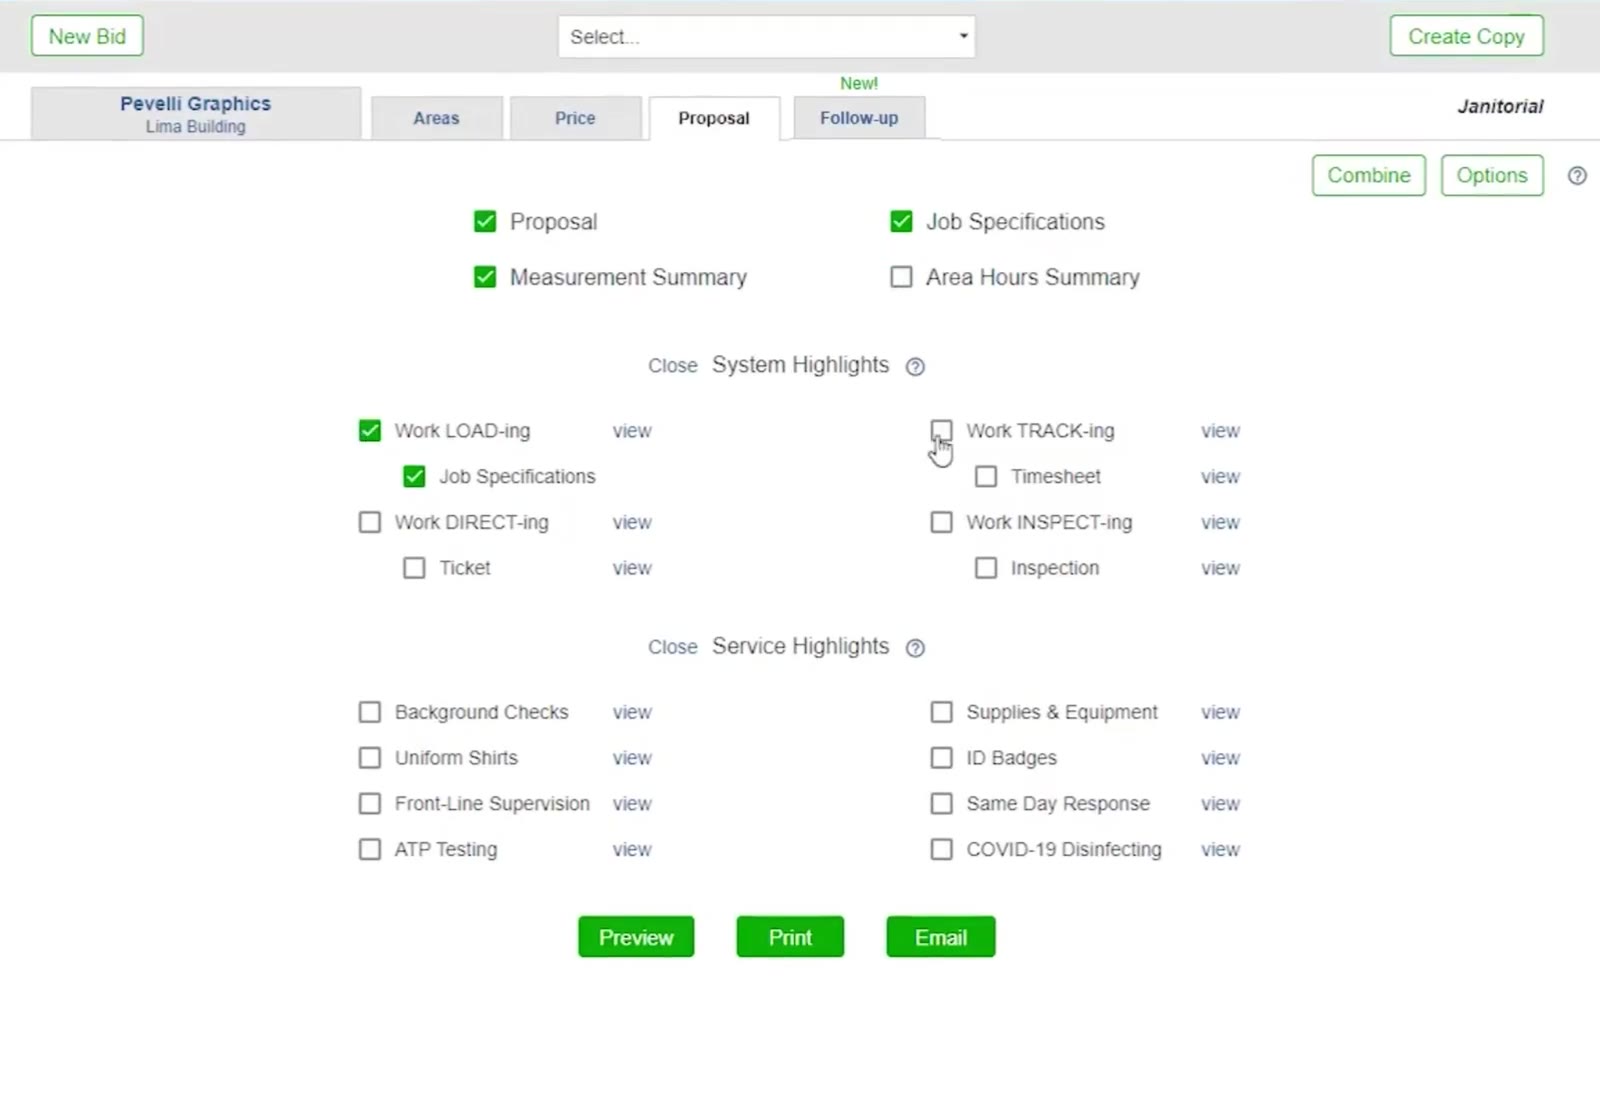
The Proposal tab: the document checkboxes at the top, then the System Highlights and Service Highlights lists.
Add your highlights
Tick any of the System Highlights — Work LOAD-ing, Work TRACK-ing, Work DIRECT-ing and Work INSPECT-ing, each with its own indented sample document — and any of the Service Highlights. Click view beside a System Highlight to read it; Service Highlights have an options link instead, where you also choose which image that highlight uses.
Open the section options
Click Options at the top right of the Proposal tab.
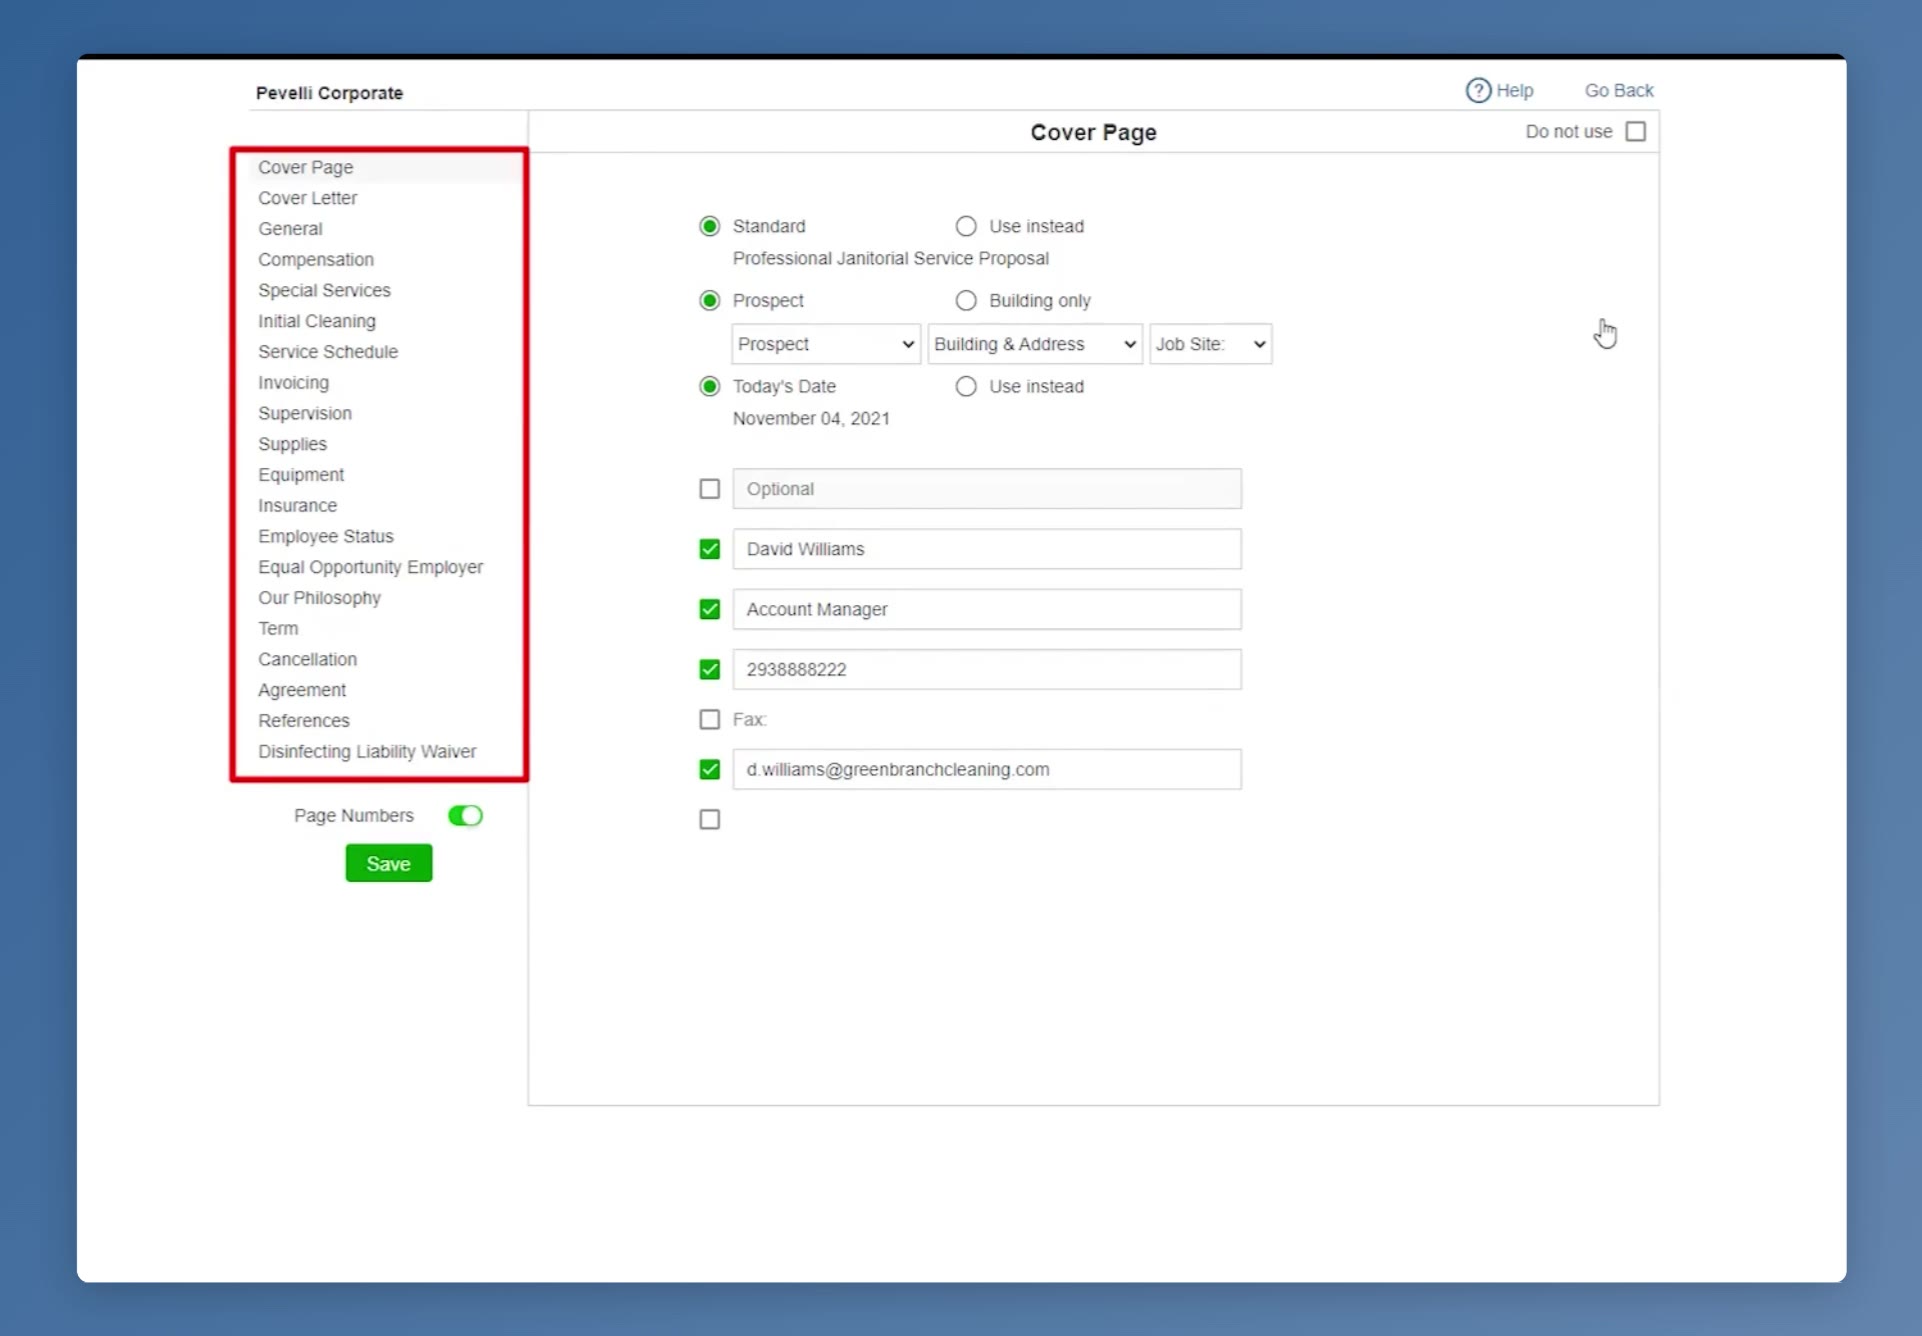
The proposal Options screen: the section list on the left, the selected section’s wording on the right, Do not use at its top right, and the Page Numbers toggle above Save.
Reword or drop a section
Pick a section in the list on the left — Cover Page, Cover Letter, General, Compensation and the rest — to change its wording, or tick Do not use to leave it out of this proposal. Page Numbers switches page numbering on and off. Click the green Save, then Go Back to return to the Proposal tab.
Preview it
Click the green Preview button at the bottom of the Proposal tab. The cover page carries your logo and contact details alongside the prospect’s.
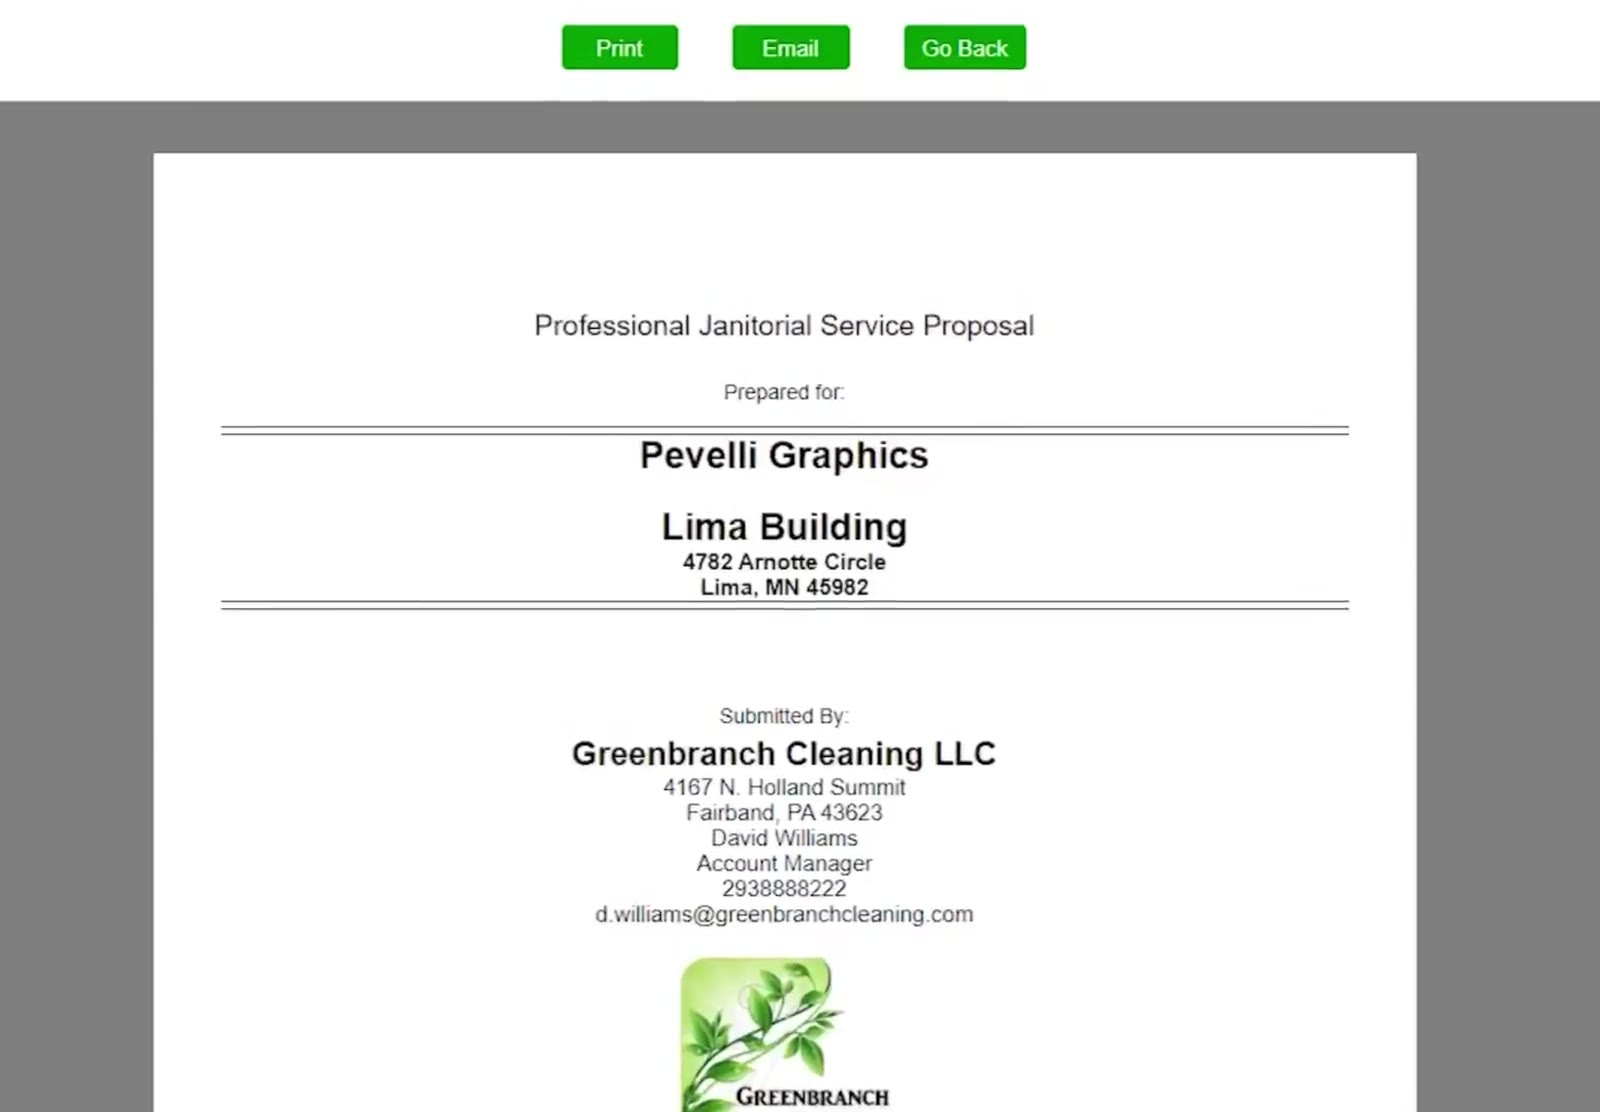
The finished proposal’s cover page in the preview, with Print, Email and Go Back above it.
Read it through, then send it
Scroll the preview to check every page, including any highlights you included. Print, Email and Go Back sit at the top.
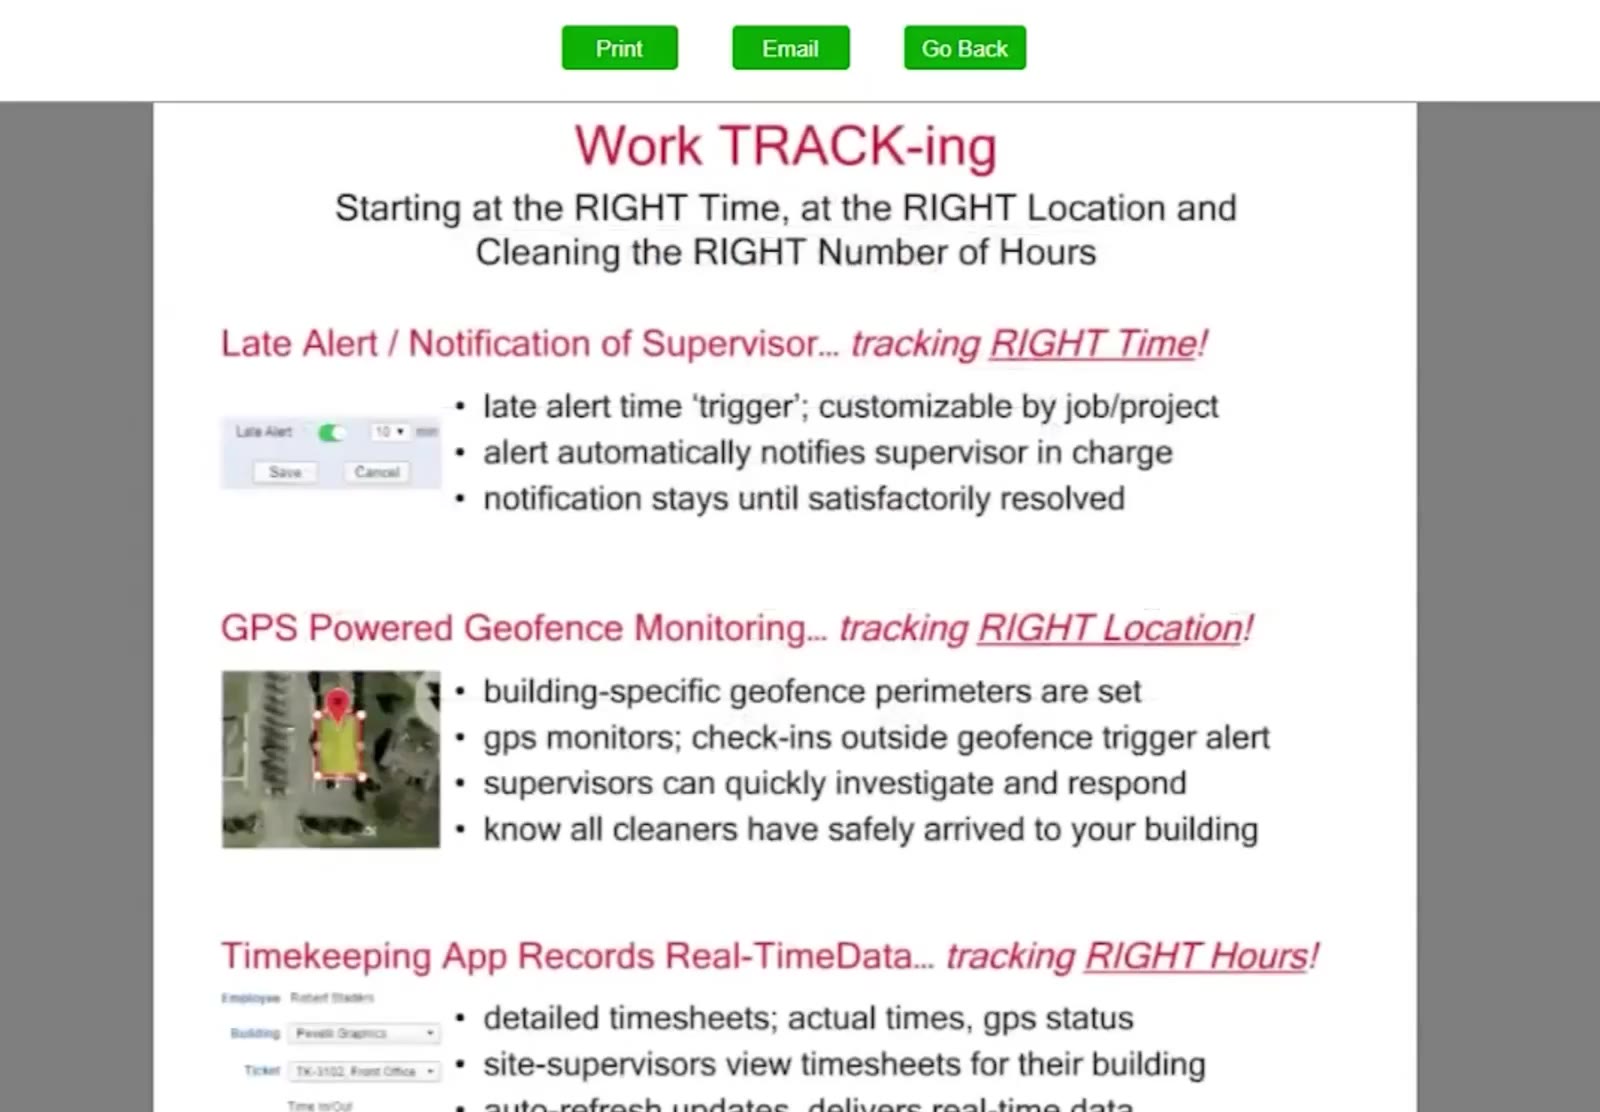
A System Highlights page as it appears in the proposal — this one is Work TRACK-ing.
FAQ
What is the difference between Express and Manual measurements?
Express takes the building’s total cleanable square footage and spreads it across the usual areas by percentage, which you can then adjust. Manual lets you measure each area yourself.
Can I add an area that Express does not list?
Yes. Use the Select area dropdown at the bottom of the Express box and click Add. You can also add an area later from the tasks screen with Add Area.
Do the percentages have to add up to 100?
Yes. The running total sits under the list and turns green when it reaches 100%.
Where do I change the cleaning tasks for an area?
On the Areas tab, click the green Options button below the area list, then pick the area on the left. Click Go Back when you are finished.
What does Recalculate do?
It updates the monthly cost and the calculated price after you change the hours, wages, taxes, overhead or profit.
Do I have to use the price CleanGuru calculates?
No. The calculated price is a starting point. Type whatever you intend to quote in Enter Price and click Save, and CleanGuru shows the profit and hourly rate that price gives you.
Can I read a highlight before I add it to the bid?
Yes. Click view beside a System Highlight, or options beside a Service Highlight, to open the page exactly as the prospect will see it.